Rocket Project
Rocket Log
Entry 1, Day 6
Today we will start our fins and adjust the nose cone.
Entry 2, Day 7
Today we worked on cutting out our fins and gluing them onto our rocket.
Entry 3, Day 8
Today we did a test launch and did not participate. We also waited for our fins to dry.
Entry 4, Day 9,
Today we adjusted the fins on our rocket.
Entry 5, Day 10
Today made and taped our nose cone.
Entry 6, Day 11
Today we began building the parachute. Tomorrow we hope to test launch.
Entry 7, Day 12
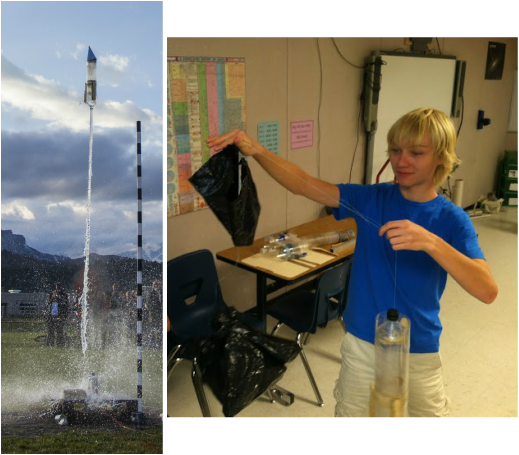
Today we launched our rocket. It flew, and the parachute deployed, but it landed in a tree.
Entry 8, Day 13
Today we finished our parachute and tied it to the rocket. Only two more days until exhibition.
Entry 9, Day 14
Today, we added finishing touches to our rocket. Tonight's exhibition.
Entry 1, Day 6
Today we will start our fins and adjust the nose cone.
Entry 2, Day 7
Today we worked on cutting out our fins and gluing them onto our rocket.
Entry 3, Day 8
Today we did a test launch and did not participate. We also waited for our fins to dry.
Entry 4, Day 9,
Today we adjusted the fins on our rocket.
Entry 5, Day 10
Today made and taped our nose cone.
Entry 6, Day 11
Today we began building the parachute. Tomorrow we hope to test launch.
Entry 7, Day 12
Today we launched our rocket. It flew, and the parachute deployed, but it landed in a tree.
Entry 8, Day 13
Today we finished our parachute and tied it to the rocket. Only two more days until exhibition.
Entry 9, Day 14
Today, we added finishing touches to our rocket. Tonight's exhibition.
Data Table
|
Rocket Empty Mass |
28.6kg |
|
Rocket Charged Mass |
31.1kg |
|
Mass of Propellant Alone |
1.5kg |
|
Volume of Propellant |
1.5 Liter |
|
Launch Pressure |
90psi |
|
Number of Stages |
1 |
|
Rocket Length |
61.2cm |
|
Number of Nozzles |
1 |
|
Friction Device |
Parachute |
|
Area of Friction Device |
1sq m |
|
Max Angle at Launch Apex |
40degrees |
|
Observer Distance |
53m |
|
Max Height |
45m |
|
Actual Flight Time |
5.33s |
|
Average Actual Velocity for Total Trip |
16.89m/s |
|
Theoretical Flight Time |
4.29s |
|
% Error in Flight Time |
26% |
Rocket Reflection
This was such an exciting project for me. I really enjoyed the hands-on work of building the rocket and going through refinement after each test launch. After the rocket project, I wish I could have gone back and really refined the rocket so it would fly much better. I wish I could have restarted completely and build it from scratch. Looking back there is a lot I wish I could have changed and refined on my rocket. I would have made a better nose cone and fins, but in the end my rocket turned out ok. The parachute deployed and it got good hight and it didn't explode into a dozen small pieces. I was glad for the help and support of my team. It would of been much harder to build our rocket and have it fly as successfully as it did without their help. During the exhibition at the soccer field, our rocket flew 45 meters high but it footballed going up which didn't allow for it to fly as high as it could have. Still, I am happy with the results that it produced.
During the building stages of the project there were so many ideas for building the rocket that came to mind, like making a double parachute among one of them. For me this gave me a whole new anticipation for the final day when we would launch the rocket that we have been working on for the last 2 weeks and witness the results of our work and hope for the best. I also learned about physics and how they affected the flight of my rocket. I hope there are more fun projects that are like this one in the future.
Rocket Conclusion
If one were to fire a water rocket and run the calculation on how high it would go, the first step would be to find the angle in degrees of the height of the rocket from a measured position on the ground, like 200 feet, or in my case 174 feet. I then found the tangent of the angle in degrees and multiplied it by the distance from the lunch pad which was 174 feet to find the height of the rocket. It took 5.33 seconds for my rocket to reach it's max height of 45 meters and to come back down. To find the average velocity of the rocket I multiplied the max height by two and divided by the flight time to get the velocity of the rocket which was 16.89 m/s. After I found the velocity, I calculated the percent error in flight time. I found the theoretical flight time by taking the height multiplied by the time and then divided by 4.9. I took the square root of that result to get the theoretical flight time. To find the error in flight time in a percentage, you take the theoretical flight time and subtract the actual flight time and multiply the answer by one hundred. There was a significant difference in the error in flight time for all of the rockets because of all the sizes of parachutes that were used on all the different rockets. This is how you would do all the calculation for firing a water rocket.
If one were to fire a water rocket and run the calculation on how high it would go, the first step would be to find the angle in degrees of the height of the rocket from a measured position on the ground, like 200 feet, or in my case 174 feet. I then found the tangent of the angle in degrees and multiplied it by the distance from the lunch pad which was 174 feet to find the height of the rocket. It took 5.33 seconds for my rocket to reach it's max height of 45 meters and to come back down. To find the average velocity of the rocket I multiplied the max height by two and divided by the flight time to get the velocity of the rocket which was 16.89 m/s. After I found the velocity, I calculated the percent error in flight time. I found the theoretical flight time by taking the height multiplied by the time and then divided by 4.9. I took the square root of that result to get the theoretical flight time. To find the error in flight time in a percentage, you take the theoretical flight time and subtract the actual flight time and multiply the answer by one hundred. There was a significant difference in the error in flight time for all of the rockets because of all the sizes of parachutes that were used on all the different rockets. This is how you would do all the calculation for firing a water rocket.
Rube Goldberg
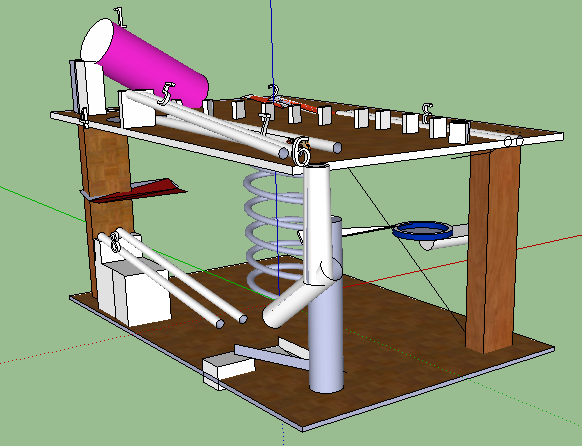
Rube Goldberg description
This project was about growing in are ability of understanding physics and how to learning to measure transfer of energy in a device that we made your s
calculation page below.
Map Project
Austin, Vivien, Kieran, Dylan, Grant
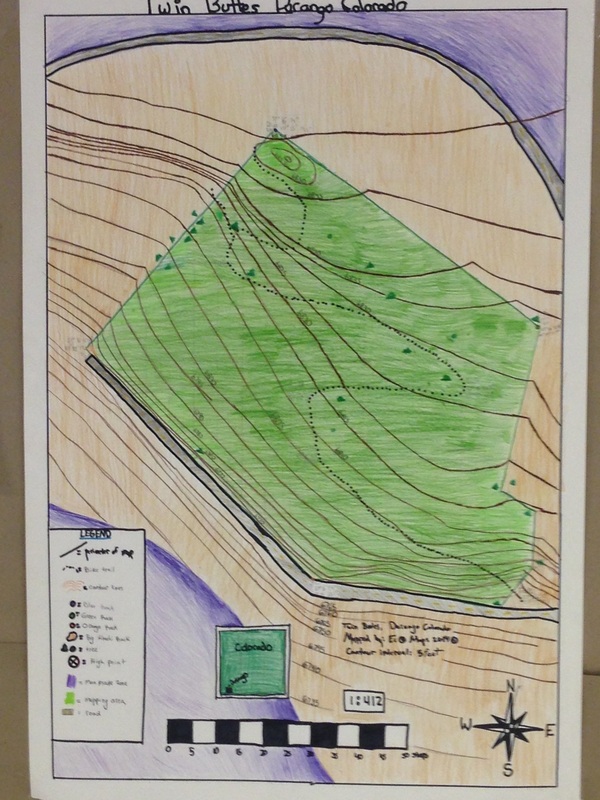
The Methodology Behind the Map
This project was focused on mapping a small area of the Twin Buttes complex in Durango Colorado. To measure the bearings and paces we used a compass. Then we took bearings of wear we were, then counted paces to the next corner. We then turned every 5 paces into 1 centimeter and use the same bearings from true north to plot the direction for every conner and way point on the map. We also used Google earth to help find contour lines, corners and the bike trail. Google earth helped us by having the contour lines and a much more accurate location of conners, the latitude and longitude, which we need to have accurate elevations. Contour lines are lines that are inside of a given area. These lines are a idea if you flooded the area and where the water would stop at certain intervals, like 5 feet. Plotting the contour lines, conners, bike trail and creating the final product gave an insight to spatial awareness. Spatial awareness refers to how a person is aware of their environment. With this project spatial awareness was necessary because it helped us check our work.